Browser Rendering Pipeline

Browser Rendering Pipeline Explained: DOM, CSSOM, Reflow & Repaint
Every time you open a webpage, your browser silently performs a breathtaking sequence of operations — parsing raw bytes, building abstract trees, calculating geometry, and finally painting pixels to your screen. This entire sequence is called the critical rendering path, and understanding it is the difference between a developer who writes code and a developer who writes fast code.
In this post, we'll walk through every major stage of the pipeline: parsing, DOM construction, CSSOM construction, render tree creation, layout (reflow), painting (repaint), and compositing. By the end, you'll know why certain operations are expensive and exactly how to avoid them.
What Is the Critical Rendering Path?
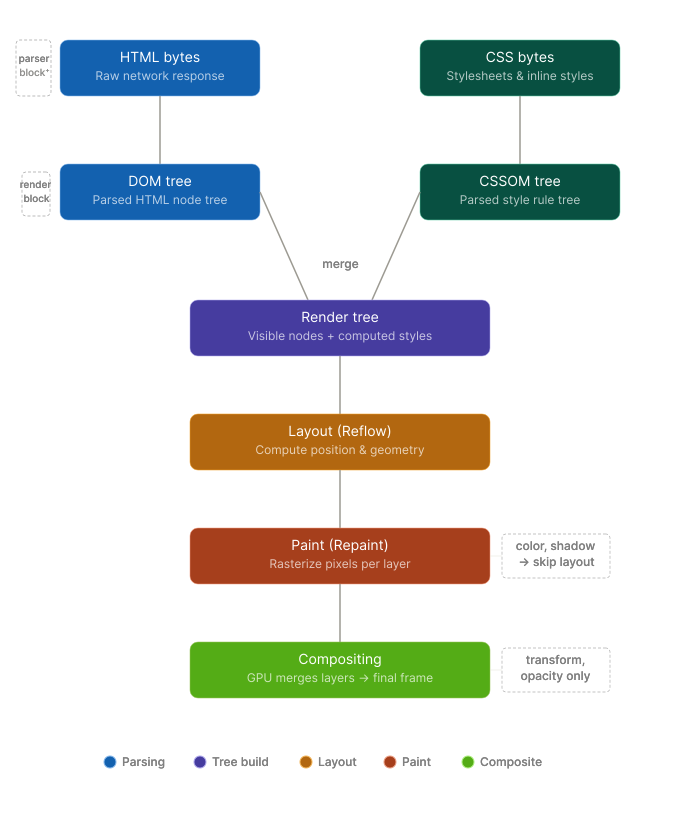
The browser rendering pipeline is the ordered sequence of steps a browser takes to convert a network response — raw HTML, CSS, and JavaScript bytes — into the visual pixels you see on screen. It is also commonly referred to as the critical rendering path (CRP).
Understanding the CRP matters because it directly answers questions like:
Why does a large CSS file delay your first paint?
Why does reading
offsetHeightin a loop tank your frame rate?Why does
transformanimate more smoothly thantop/left?
The pipeline can be broken into six major stages:
Parsing HTML → DOM
Parsing CSS → CSSOM
Building the Render Tree
Layout (Reflow)
Painting (Repaint)
Compositing
Let's go through each one.
Stage 1: Parsing HTML and Building the DOM
When the browser receives the first bytes from the server, the HTML parser begins work immediately. It reads the bytestream, converts it to characters using the declared charset, and tokenizes the characters into start tags, end tags, attributes, and text nodes.
These tokens are then processed by the tree construction algorithm (defined by the HTML5 spec) to build the Document Object Model (DOM) — a tree-shaped, in-memory representation of the page structure.
Bytes → Characters → Tokens → Nodes → DOM TreeEach HTML element becomes a node in this tree. <html> is the root, with <head> and <body> as children, and so on recursively.
Blocking: Scripts and the Parser
One critical detail: when the HTML parser encounters a <script> tag without async or defer, it stops parsing and hands control to the JavaScript engine. This is because scripts can modify the DOM (via document.write, for example), so the parser cannot safely continue until the script finishes executing.
This is why the golden rule — put scripts at the bottom of <body> or use defer — exists. A blocking script encountered early in <head> can significantly delay DOM construction and push back your first paint.
Stage 2: Parsing CSS and Building the CSSOM
While the HTML parser builds the DOM, a parallel (but equally critical) process handles CSS. Every stylesheet — whether inline, in a <style> tag, or linked via <link> — gets parsed into the CSS Object Model (CSSOM).
The CSSOM is a tree just like the DOM, but it represents style rules and their computed values. It captures the full cascade: user agent styles, author styles, and inline styles, all resolved into final computed values for every node.
CSS Bytes → Characters → Tokens → Rules → CSSOM TreeWhy CSS Is Render-Blocking
Unlike HTML parsing, CSS is fully render-blocking. The browser cannot construct the render tree (next step) until both the DOM and CSSOM are complete. This is intentional — rendering a page without its styles would produce a flash of unstyled content (FOUC), which is a terrible user experience.
This is why minimizing CSS payload size and deferring non-critical styles matters so much for performance. A large stylesheet delays the entire rendering pipeline.
Stage 3: Building the Render Tree
Once the DOM and CSSOM are both ready, the browser combines them into the Render Tree. This tree contains only the nodes that will actually appear on screen, along with their computed styles.
Key rules during render tree construction:
Nodes with
display: noneare excluded from the render tree entirely.Nodes with
visibility: hiddenare included (they occupy space, just invisibly).Pseudo-elements like
::beforeand::afterare included even though they don't exist in the DOM.
The render tree is the blueprint the browser uses for the next two stages — it knows what to render and how it should look, but not yet where.
Stage 4: Layout (Reflow)
With the render tree ready, the browser calculates the exact position and size of every element on the page. This stage is called Layout (or Reflow when triggered after the initial paint).
During layout, the browser walks the render tree and computes the box model for each node: width, height, margin, padding, border, and position relative to its containing block. Everything is resolved to absolute pixel values.
What Triggers a Reflow?
After the initial load, reflow can be triggered by any operation that changes an element's geometry:
Changing
width,height,margin,padding,top,leftAdding or removing DOM nodes
Changing font size or line height
Resizing the browser window
Reading layout properties like
offsetWidth,scrollTop,getBoundingClientRect()
Layout Thrashing
A notoriously expensive pattern is layout thrashing (also called forced synchronous layout): alternating between reading and writing layout properties inside a loop.
javascript
// BAD: causes layout thrashing
elements.forEach(el => {
  const width = el.offsetWidth; // forces layout (read)
  el.style.width = width * 2 + 'px'; // invalidates layout (write)
});

// GOOD: batch reads, then batch writes
const widths = elements.map(el => el.offsetWidth); // all reads
elements.forEach((el, i) => {
  el.style.width = widths[i] * 2 + 'px'; // all writes
});
Every time you read a layout property after a DOM write, the browser must synchronously recompute layout before returning the value. Doing this in a loop can trigger hundreds of unnecessary reflows per frame, dropping you well below 60fps.
Stage 5: Painting (Repaint)
After layout, the browser knows where everything goes. Now it must actually draw the pixels — this is the Paint stage (or Repaint when triggered after initial paint).
Painting converts each render tree node into actual pixels. It handles:
Text rendering (glyphs, kerning)
Colors and backgrounds
Borders and shadows
Images and SVGs
Painting is done in layers. The browser uses a concept called the stacking context to determine paint order (z-index, opacity, transforms create new stacking contexts).
What Triggers a Repaint?
A repaint is triggered by any visual change that doesn't affect layout:
color,background-colorbox-shadow,border-radiusopacity(unless promoted to its own compositor layer)visibility
Repaints are cheaper than reflows since geometry doesn't need to be recalculated, but painting a large area of the screen is still expensive.
Stage 6: Compositing
Modern browsers introduce one more stage after painting: Compositing. The browser may split the page into multiple compositor layers and render each independently on the GPU, then combine (composite) them into the final image.
Elements that get their own compositor layer:
Elements with
will-change: transformorwill-change: opacityElements using
transform: translateZ(0)ortransform: translate3d()<video>,<canvas>,<iframe>Elements with CSS animations on
transformoropacity
Why This Matters for Animation
Animating transform and opacity triggers only compositing — no reflow, no repaint. The GPU handles it entirely. This is why transform: translateX() is far more performant than left: Xpx for animations.
Want to know exactly which CSS properties trigger reflow, repaint, or
only compositing? Check CSS Triggers.
/* BAD: triggers layout + paint on every frame */
.box { transition: left 300ms ease; }

/* GOOD: triggers only compositing */
.box { transition: transform 300ms ease; }
The Full Pipeline at a Glance
HTML bytes
    ↓ parsing
  DOM Tree
    +
CSS bytes
    ↓ parsing
 CSSOM Tree
    ↓ merge
Render Tree
    ↓ layout
 Geometry (Reflow)
    ↓ paint
  Pixels (Repaint)
    ↓ composite
  Final Frame
Performance Checklist
Optimization | Stage Affected |
|---|---|
Use | Unblocks DOM parsing |
Minify and inline critical CSS | Unblocks CSSOM |
Avoid | Reduces reflow count |
Batch DOM reads before writes | Prevents layout thrashing |
Use | Skips reflow + repaint |
Use | Promotes element to GPU layer |
Avoid large/complex CSS selectors | Speeds up CSSOM matching |
Conclusion
The browser rendering pipeline is not magic — it's a deterministic, well-documented sequence of steps. Every performance decision you make as a frontend developer either respects or fights against this pipeline.
When you write el.style.left = x + 'px' in an animation, you're forcing reflow + repaint 60 times per second. When you switch to el.style.transform = 'translateX(' + x + 'px)', you're letting the GPU handle it entirely. Same visual result, completely different cost.
Understanding the pipeline directly impacts your real-world scores — reflow and repaint are two of the biggest reasons LCP and INP suffer.
Start auditing your pages with Chrome DevTools' Performance panel. Look for long purple (layout) and green (paint) bars. Those are your reflow and repaint hotspots — and now you know exactly how to fix them.
This post is part of the Frontend System Design series on NoteHub.